Introduction#
Talos is rapidly becoming the go-to operating system for Kubernetes clusters, and for good reason. As part of my ongoing experiments with my homelab, I decided to see if the hype was justified. Spoiler: It is!
Here’s why I chose Talos over other options:
- Small footprint: Talos has a minimal size, which makes it perfect for resource-constrained environments like Raspberry Pi.
- No SSH access: Talos enhances security by eliminating SSH access, ensuring that all interactions are API-driven.
- API-driven configuration: This is a key feature that aligns perfectly with my goal of managing everything via Kubernetes.
The latter two points were particularly appealing to me since I wanted to be fully constrained to using only Kubernetes. Before diving into the technical details, let me recap my current setup and needs.
My Setup#
My setup consists of the following hardware:
- 4 raspberry model 4b 8gb ram with 64gb microsd Amazon link
- Ethernet switch Netgear 4 POE Amazon link
- 4 ethernet POE hat Amazon link
- GeeekPi Raspberry Pi Cluster (with an external fan) Amazon link
Given the limited resources, I’ve designated one Raspberry Pi as the control plane, while the other three serve as worker nodes. The cluster is named “Gandalf cluster”, with the following components:
- 1 control plane “Gandalf-controlplane"
- 3 worker nodes “Gandalf-workerX”
Installation#
Although the configurations for the control plane and workers differ, the OS installation process is identical for both. Talos provides a well-documented installation guide, but I’ll highlight some specifics related to my setup.
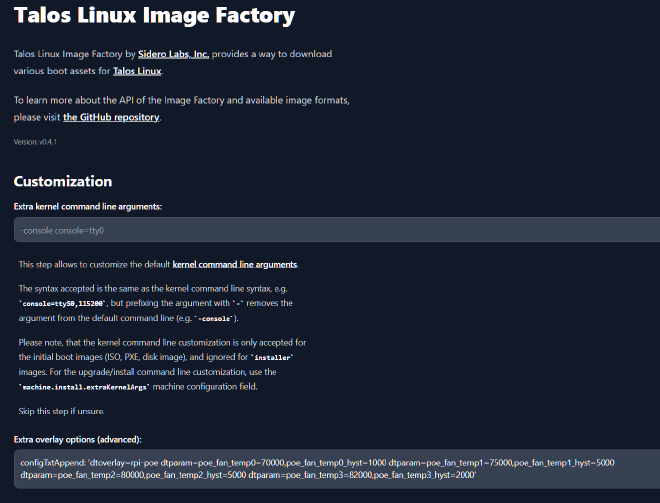
In previous projects, I’ve had issues with the loud fan noise from the official Ethernet POE HAT.
To mitigate this, I adjusted the fan settings in config.txt:
dtoverlay=rpi-poe
dtparam=poe_fan_temp0=70000,poe_fan_temp0_hyst=1000
dtparam=poe_fan_temp1=75000,poe_fan_temp1_hyst=5000
dtparam=poe_fan_temp2=80000,poe_fan_temp2_hyst=5000
dtparam=poe_fan_temp3=82000,poe_fan_temp3_hyst=2000
This config ensures that the fan is activated in certain temperature range (above 70).
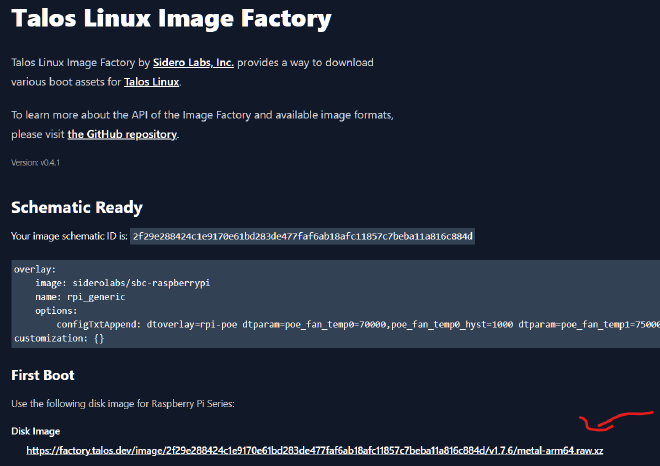
On Talos, direct modification of config.txt isn’t possible, but you can customize the official Raspberry Pi image through Talos Factory
configTxtAppend: 'dtoverlay=rpi-poe dtparam=poe_fan_temp0=70000,poe_fan_temp0_hyst=1000 dtparam=poe_fan_temp1=75000,poe_fan_temp1_hyst=5000 dtparam=poe_fan_temp2=80000,poe_fan_temp2_hyst=5000 dtparam=poe_fan_temp3=82000,poe_fan_temp3_hyst=2000'
Controlplane Installation#
After installing the Talos OS on the microSD card, the official guide suggests using the interactive installation.
However, I opted out for two reasons:
- The interactive installation command was unresponsive when run from my PC to the node.
- I preferred full control over the configuration.
First, I installed the talosctl:
curl -sL 'https://www.talos.dev/install' | bash`
For zsh users, you can set up auto-completion by adding this to your .zshrc:
source <(talosctl completion zsh)`
Next, I generated the default talosctl config for both controlplane and worker nodes:
export $TALOS_CLUSTER_NAME=Gandalf
export $RASPBERRY_PI_CONTROLPLANE_IP=192.168.11.20
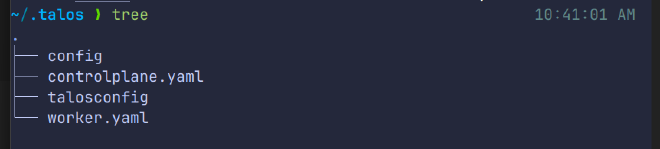
talosctl gen config $TALOS_CLUSTER_NAME https://$RASPBERRY_PI_CONTROLPLANE_IP:6443 -o $HOME/.talos/
This will generate the configuration files in the .talos directory.
Here’s a look at my customized configuration for the control plane:
version: v1alpha1
debug: false
persist: true
machine:
  type: controlplane
  token: <generated-by-talosctl>
  ca:
    crt: <generated-by-talosctl>
    key: <generated-by-talosctl>
  certSANs: []
  kubelet:
    image: ghcr.io/siderolabs/kubelet:v1.30.3
    defaultRuntimeSeccompProfileEnabled: true
    disableManifestsDirectory: true
    extraArgs:
      rotate-server-certificates: true
  network:
	hostname: gandalf-controlplane
  # `interfaces` is used to define the network interface configuration.
	 nameservers:
     - 192.168.50.1
     - 8.8.4.4
     - 8.8.8.8
	 - 1.1.1.1
	interfaces:
     - interface: eth0 # The interface name.
       # Assigns static IP addresses to the interface.
       addresses:
         - 192.168.11.20/24 # Static ip address for the controlplane
       routes:
         - network: 0.0.0.0/0 # The route's network (destination).
           gateway: 192.168.50.1 # The route's gateway (if empty, creates link scope route).
           metric: 1024 # The optional metric for the route.
	   dhcp: true

    extraHostEntries:
       - ip: 192.168.11.20 # The IP of the controlplane node
	     aliases:
	     - gandalf-controlplane # Controlplane node alias
       - ip: 192.168.11.21 # The IP of the worker node  1
	     aliases:
	     - gandalf-worker # Worker 1 alias
       - ip: 192.168.11.22 # The IP of the worker node 2
	     aliases:
	     - gandalf-worker2 #  Worker 2 alias
       - ip: 192.168.11.23 # The IP of the worker node 3
	     aliases:
	     - gandalf-worker3 # Worker 3 alias
  install:
    disk: /dev/mmcblk0
    image: ghcr.io/siderolabs/installer:v1.7.6
    wipe: false
    bootloader: true
  registries: {}
  features:
    rbac: true # Enable role-based access control (RBAC).
    stableHostname: true # Enable stable default hostname.
    hostDNS:
      enabled: true # Enable host DNS caching resolver.
cluster:
  id: <generated-by-talosctl>
  secret: <generated-by-talosctl> .
  controlPlane:
    endpoint: https://192.168.11.20:6443 #
  clusterName: Gandalf # Configures the cluster's name.
  network:
    dnsDomain: cluster.local # The domain used by Kubernetes DNS.
    podSubnets:
      - 10.244.0.0/16
    serviceSubnets:
      - 10.96.0.0/12
  token: <generated-by-talosctl>
  secretboxEncryptionSecret: <generated-by-talosctl>
  ca:
    crt: <generated-by-talosctl>
    key: <generated-by-talosctl>
  aggregatorCA:
    crt: <generated-by-talosctl>
    key: <generated-by-talosctl>
  serviceAccount:
    key: <generated-by-talosctl>
  apiServer:
    image: registry.k8s.io/kube-apiserver:v1.30.3
    certSANs:
      - 192.168.11.20
    disablePodSecurityPolicy: true
    admissionControl:
      - name: PodSecurity
        configuration:
          apiVersion: pod-security.admission.config.k8s.io/v1alpha1
          defaults:
            audit: restricted
            audit-version: latest
            enforce: baseline
            enforce-version: latest
            warn: restricted
            warn-version: latest
          exemptions:
            namespaces:
              - kube-system
            runtimeClasses: []
            usernames: []
          kind: PodSecurityConfiguration
    # Configure the API server audit policy.
    auditPolicy:
      apiVersion: audit.k8s.io/v1
      kind: Policy
      rules:
        - level: Metadata
  controllerManager:
    image: registry.k8s.io/kube-controller-manager:v1.30.3 # The container image used in the controller manager manifest.
  proxy:
    image: registry.k8s.io/kube-proxy:v1.30.3 # The container image used in the kube-proxy manifest.
  scheduler:
    image: registry.k8s.io/kube-scheduler:v1.30.3
  discovery:
    enabled: true # Enable the cluster membership discovery feature.
    registries:
      kubernetes:
        disabled: true
      service: {}
  etcd:
    ca:
      crt: <generated-by-talosctl>
      key: <generated-by-talosctl>
  extraManifests: []
  inlineManifests: []
Most of the autogenerated comments have been removed for brevity.
You can find more details in the official configuration guide here or directly in the autogenerated YAML files.
I’d like to highlight a few decisions, especially regarding the network configuration.
I enforced a static IP on the Raspberry Pi interface with DHCP enabled.
The IP addresses belong to VLAN11, which I dedicated to the Raspberry Pi cluster (192.168.11.0/24). I added extraHostEntries for hostname-based IP lookups for the worker nodes.
After configuring, I deployed the configuration on the control plane using::
export $RASPBERRY_PI_CONTROLPLANE_IP=192.168.11.20
talosctl apply-config --insecure --nodes $RASPBERRY_PI_CONTROLPLANE_IP --file $HOME/.talos/controlplane.yaml
Worker Installation#
The configuration for the worker nodes is quite similar to the control plane.I took advantage of Talosctl’s auto-discovery feature, which automatically joins worker nodes to the control plane node:
version: v1alpha1 # Indicates the schema used to decode the contents.
debug: false # Enable verbose logging to the console.
persist: true
machine:
  type: worker # Defines the role of the machine within the cluster.
  token: <generated_by_talosctl>
  ca:
    crt: <generate_by_talosctl>
    key: ""
  certSANs: []

  kubelet:
    image: ghcr.io/siderolabs/kubelet:v1.30.3
    defaultRuntimeSeccompProfileEnabled: true
    disableManifestsDirectory: true
  network:
    hostname: gandalf-worker
    extraHostEntries:
       - ip: 192.168.11.20 # The IP of the controlplane node
	     aliases:
	     - gandalf-controlplane # Controlplane node alias
       - ip: 192.168.11.21 # The IP of the worker node  1
	     aliases:
	     - gandalf-worker # Worker 1 alias
       - ip: 192.168.11.22 # The IP of the worker node 2
	     aliases:
	     - gandalf-worker2 #  Worker 2 alias
       - ip: 192.168.11.23 # The IP of the worker node 3
	     aliases:
	     - gandalf-worker3 # Worker 3 alias
    nameservers:
       - 192.168.50.1
       - 8.8.4.4
       - 8.8.8.8
       - 1.1.1.1
    interfaces:
      - interface: eth0 # The interface name.
        addresses:
          - 192.168.11.21/24
        dhcp: true
        routes:
          - network: 0.0.0.0/0 # The route's network (destination).
            gateway: 192.168.50.1 # The route's gateway (if empty, creates link scope route).
            metric: 1024 # The optional metric for the route.
  install:
    disk: /dev/mmcblk0 # The disk used for installations.
    bootloader: true
    image: ghcr.io/siderolabs/installer:v1.7.6 # Allows for supplying the image used to perform the installation.
    wipe: false # Indicates if the installation disk should be wiped at installation time.
  registries: {}
  # Features describe individual Talos features that can be switched on or off.
  features:
    rbac: true # Enable role-based access control (RBAC).
    stableHostname: true # Enable stable default hostname.
    hostDNS:
      enabled: true # Enable host DNS caching resolver.

cluster:
  id: <generated_by_talosctl>
  secret: <generated_by_talosctl>
  controlPlane:
    endpoint: https://192.168.11.20:6443
  network:
    dnsDomain: cluster.local
    podSubnets:
      - 10.244.0.0/16
    serviceSubnets:
      - 10.96.0.0/12

  token: <generated_by_talosctl>
  ca:
    crt: <generated_by_talosctl>
    key: ""
  discovery:
    enabled: true # Enable the cluster membership discovery feature.
    registries:
      kubernetes: {}
      service: {}
To apply the configuration to the worker nodes, I used the following commands:
export RASPBERRY_PI_WORKER=192.168.11.21
talosctl apply-config -i -n $RAPSBERRY_PI_WORKER --file .talos/worker.yaml
For the others worker nodes, replicate the same configuration with the changed IP address.
To verify if the worker nodes successfully joined the control plane, I ran:
talosctl get affiliates -n $RASPBERRY_PI_CONTROLPLANE_IP
Export Kubeconfig and Useful commands#
After setting up the cluster, I exported the Kubeconfig to interact with the Kubernetes API server using the kubectl command-line tool:
talosctl kubeconfig --force-context-name $CLUSTER_NAME --nodes $RASPBERRY_PI_CONTROLPLANE_IP
Now, I can manage the cluster throug kubectl cli.

There are also several useful commands for modifying machine configurations or checking the health status of nodes like:
talosctl edit machineconfig -n <ip_node_to_check>
talosctl health -n <ip_node>
Conclusion#
Talos on Raspberry Pi has proven to be a robust, lightweight, and secure OS for managing Kubernetes clusters. By leveraging Talos’ API-driven model, I’ve been able to achieve a streamlined, Kubernetes-centric environment that perfectly suits my homelab’s needs. The Gandalf Cluster is now up and running, ready to handle any workloads I throw at it.
If you want to add more control plane nodes, you can use Talosctl’s virtual IP feature, which you can learn more about here.
If you’re looking to set up a Kubernetes cluster with minimal overhead and a focus on security, I highly recommend giving Talos a try.
In the next blog series, I’ll dive deep into GitOps configuration with FluxCD.