Introduction#
Back when I first discovered Jenkins, I was so amped up that, with a Jenkinsfile and a few steps, I could set up a full-fledged CI/CD pipeline for any application.
But over time, that excitement started to fade as I encountered the pain and hassle of debugging, learning new syntax for each new CI/CD tool, and, of course, dealing with the frustrations of YAML files.
Coming from a software engineering background, I’ve struggled with using YAML. While I appreciate the declarative approach, seriously—what’s up with those tab spaces? They drive me crazy. For those wondering, no, a shared library isn’t the solution. They always end up becoming a bloated codebase that turns into a monolith itself.
So, while browsing the web for cool open-source tools, I stumbled across a project called Dagger. As soon as I saw their tagline, “Good-bye push & pray,” I was intrigued. I’ve lost count of how many times I’ve pushed a pipeline update and just prayed it worked, writing endless echo statements to figure out what was happening.
Let’s dive into the “Daggerized” world.
What is Dagger?#
Dagger is a tool designed to streamline the CI/CD process by running your application delivery pipelines in containers.
This means you get the same environment both locally and remotely—no more “push and pray.” Instead, you can get instant local feedback on what’s going wrong in your pipeline.
You can create Dagger Functions (we’ll get into what that means in a bit) that make up your pipeline in any programming language.
Then, you can chain these functions together to create a fully operational CI/CD process.
So, what’s the advantage?
- You get the full power of a programming language.
- You can debug your pipelines locally.
- It’s tool-agnostic:
Daggerworks with all CI/CD tools out there (GitHub Actions, Jenkins, etc.).
How Dagger works#
The building block of Dagger is the Dagger Function, which represents an atomic step in your CI/CD pipeline—things like pulling a Docker image, copying a file, or building an image.
By chaining these functions together, you build out your entire CI/CD process.
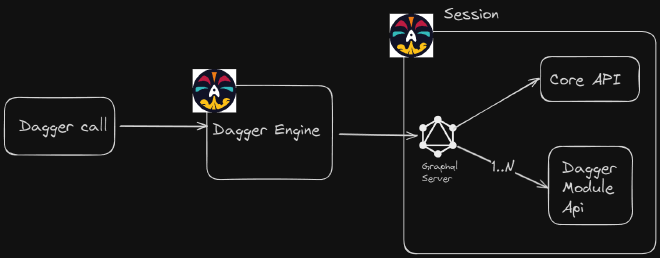
The below image shows high-level overview architechture:

A quick overview:
- When you call a function with
dagger call function_name,Daggerspawns a session or revives an existing one. - The session starts a
GraphQL API server. - The server comes pre-loaded with core APIs like container, directory, and more.
- When you import new modules, their APIs get added to the server.
You can then call these APIs inside your Dagger functions to build your process. And if you don’t want to build everything from scratch, you can use existing “Dagger Modules” from Daggerverse, which can contain one or more Dagger Functions.
Now that we’ve got the basics down, let’s jump into a demo.
Demo: Dagger with a Java Hello World Application and GitHub Actions#
Full source code here:
Dagger runs an hello-world java application with maven 3.9.9 and openjdk 17
Prerequsites#
- Docker installed
- Dagger CLI (check out the quickstart guide for more info)
The Setup#
For this demo, I’m using a small Java application that prints “Hello World.” It uses Maven for building and testing, and OpenJDK-17 for the runtime. We’ll be using Go to build our Dagger project.
First, let’s initialize the Dagger project in the application source directory:
dagger init --sdk=go --source=./dagger
This creates:
- A dagger.json file in the source directory.
- A Go module in the dagger directory.
Next, let’s create the first Dagger function in main.go:
func (m *DaggerHelloWorld) BuildEnv(source *dagger.Directory) *dagger.Container {
	mavenCache := dag.CacheVolume("maven")

	return dag.Container().
		From("maven:3.9.9").
		WithDirectory("/src", source.WithoutDirectory("dagger")).
		WithMountedCache("/root/.m2", mavenCache).
		WithWorkdir("/src")
}
This function returns a maven:3.9.9 container with a /src directory (where the Java source code is stored) and a cache.
Dagger uses the concept of “Just-In-Time Containers.” According to the docs:
“You can think of a just-in-time container as a build stage in a Dockerfile. Each operation produces a new immutable state that can be further processed or exported as an OCI image.”
You can pass these containers between functions, adding new artifacts as needed.
Next, we define the build and test steps:
func (m *DaggerHelloWorld) Build(ctx context.Context, source *dagger.Directory) *dagger.File {
	return m.BuildEnv(source).
		WithExec([]string{"mvn", "-B", "-DskipTests", "clean", "package"}).
		File("target/my-app-1.0-SNAPSHOT.jar")
}

func (m *DaggerHelloWorld) Test(ctx context.Context, source *dagger.Directory) (string, error) {
	return m.BuildEnv(source).
		WithExec([]string{"mvn", "test"}).
		Stdout(ctx)
}
It’s pretty straightforward—run the Maven build and test commands. You can try out the build function locally with:
dagger call build --source=.
Finally, let’s chain everything together in a publish function that also pushes the image to ttl.sh:
func (m *DaggerHelloWorld) Publish(ctx context.Context, source *dagger.Directory) (string, error) {
	// Run unit tests
	_, err := m.Test(ctx, source)
	if err != nil {
		return "", err
	}
	// Build and publish the image
	return dag.Container().
		From("eclipse-temurin:17-alpine").
		WithFile("/app/my-app-1.0-snapshot", m.Build(ctx, source)).
		WithEntrypoint([]string{"java", "-jar", "/app/my-app-1.0-snapshot"}).
		Publish(ctx, fmt.Sprintf("ttl.sh/dagger-maven-%.0f", math.Floor(rand.Float64()*10000000))) //#nosec
}
To try it out locally, run:
dagger call publish --source=.

Debugging#
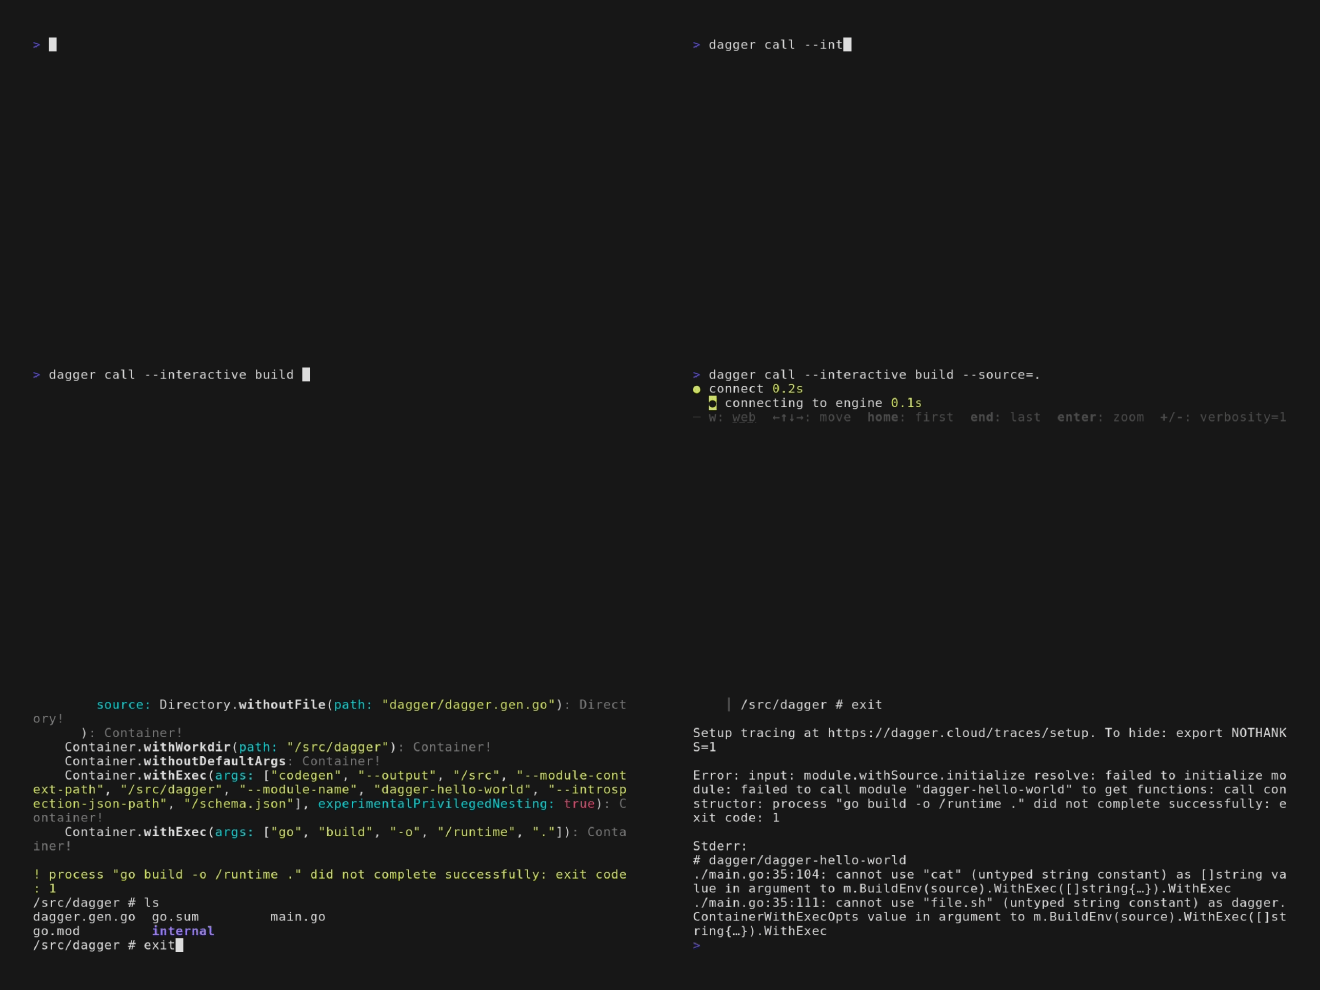
All the functions above can be debugged locally easily with interactive terminals.
You can set either explicit breakpoint within the code or call the dagger cli with --interactive arg.
An explicit breakpoint:
func (m *DaggerHelloWorld) Build(ctx context.Context, source *dagger.Directory) *dagger.File {
	return m.BuildEnv(source).WithExec([]string{"mvn", "-B", "-DskipTests", "clean", "package"}).Terminal()
	.File("target/my-app-1.0-SNAPSHOT.jar")
}
The Terminal() function stops the execution and starts a terminal session:

The --interactive opens up a terminal when gets an error:
func (m *DaggerHelloWorld) Build(ctx context.Context, source *dagger.Directory) *dagger.File {
	return m.BuildEnv(source).WithExec([]string{"mvn", "-B", "-DskipTests", "clean", "package"}).WithExec([]string{"cat","file.xml"})
	.File("target/my-app-1.0-SNAPSHOT.jar")
}

You can even spawn a terminal at the end of Dagger function with:
dagger call build --source=. terminal --cmd=bash
Github Action#
Finally, here’s how you can integrate Dagger with GitHub Actions:
name: dagger
on:
  push:
    branches: [main]
jobs:
  build-publish:
    runs-on: ubuntu-latest
    steps:
      - name: Checkout
        uses: actions/checkout@v4
      - name: Call Dagger Function to build and publish to ghcr.io
        uses: dagger/dagger-for-github@v6
        with:
          version: "latest"
          verb: call
          args: publish --source=.
This setup checks out the code, calls the Dagger publish function, and pushes the result to ttl. Example here
Wrap up#
Dagger is an amazing project that brings flexibility and power to CI/CD pipelines, letting you leverage your favorite programming languages and debug locally. It’s still evolving, but the potential is huge. I love how it abstracts away the specific CI/CD tool, making your workflow truly tool-agnostic.
That said, one area for improvement is logging and tracing. Dagger’s DAG-based execution model means you don’t get as much detailed logging as you might want—but that’s where Dagger Cloud comes in, offering traces for every function run. Still, I prefer not to rely on a cloud service.
Let me know if you’d like a deeper dive into the Dagger world!

