Introduction#
I stumbled upon the fact that many tech enthusiasts I follow use Arch Linux as their daily driver, so I decided to give it a try. While waiting for my Framework laptop to arrive, I set up a VM on VirtualBox to start the Arch Linux installation.
The beauty lies in doing it the hard way, as an educational experience—no shortcuts, just starting from scratch. You’ll be surprised by how much you can learn from it. I certainly did, and I had to rethink topics I typically take for granted, such as partitioning, LVM, encryption, bootloaders, and desktop environments.
This blog post walks you through the steps from setting up a VirtualBox VM to having a fully-fledged Arch Linux installation with GNOME. I hope you find it useful.
VirtualBox setup#
First, set up your VM in VirtualBox with an appropriate amount of memory, disk space, and CPU power.
My configuration:#
- 6 CPUs
- 8 GB RAM
- 95 GB hard disk
You can adapt these settings by using fewer CPUs or less RAM, but it’s highly recommended to allocate at least 50 GB of disk space to allow room for swap and the root partition.
Don’t forget to enable EFI in the settings: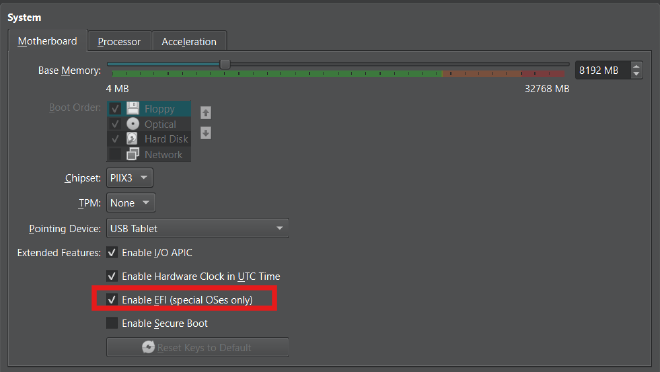
Next, download the Arch Linux ISO:
- Arch Linux ISO
- ISO.sig signature
Verifying the ISO is crucial to ensure it hasn’t been tampered with:
gpg --auto-key-locate clear,wkd -v --locate-external-key pierre@archlinux.org
gpg --keyserver-options auto-key-retrieve --verify archlinux-2024.09.01-x86_64.iso.sig archlinux-2024.09.01-x86_64.iso
Once verified, mount the ISO to your VM:
Go to Settings → Storage → Controller IDE → Add optical drive → Select the Arch Linux ISO.
Finally, boot the VM and start the installation.
First Boot with Arch ISO#
Follow the official installation guide.
Start with basic commands:
localectl list-keymaps # list keymaps
loadkeys us # choose whatever keymaps you want
setfont ter-132b
cat /sys/firmware/efi/fw_platform_size # verify efi OS
The last command returns 64 or 32, indicating that you are running an EFI OS (this is expected since you checked the EFI option in the VM settings)
Check for an internet connection:
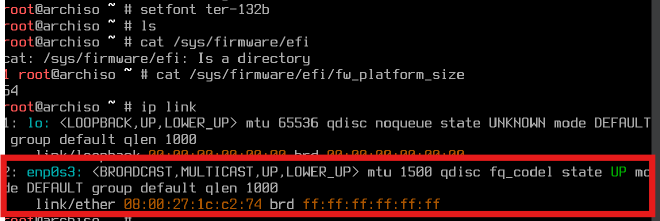
Make sure your wired interface (usually enp0s3) is up.
Change the network mode in VirtualBox from NAT to bridged mode to get a private IP for SSH access.
ip link # Check the network status
systemctl status sshd.service # Verify SSH service is running
passwd # Set the root password
Grab the private IP address: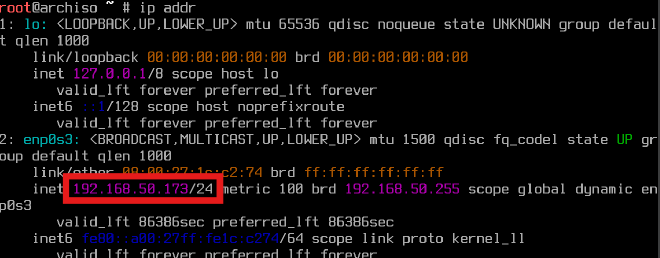
SSH into the VM from your terminal:
ssh root@<private_ip_address>
# insert the password configured in the passwd
Partitioning and Encryption#
For the VM’s 95GB disk, I configured:
- A boot partition (1 GB)
- A second partition (94 GB), which will be encrypted and configured as an LVM volume.
Partition Layout:#
| Partition | Mount Point | Size | Description |
|---|---|---|---|
| /dev/sda1 | /boot/efi | 1GB | EFI Boot Partition |
| /dev/sda2 | Encrypted | 94GB | Encrypted LVM Partition |
| Inside LVM Group ‘Gandalf’: | |||
| /dev/Gandalf/swap | [SWAP] | 4GB | Swap Partition |
| /dev/Gandalf/root | / | 30GB | Root Partition |
| /dev/Gandalf/home | /home | 60GB | Home Partition |
For checking the current disk mounted:
fdisk -L
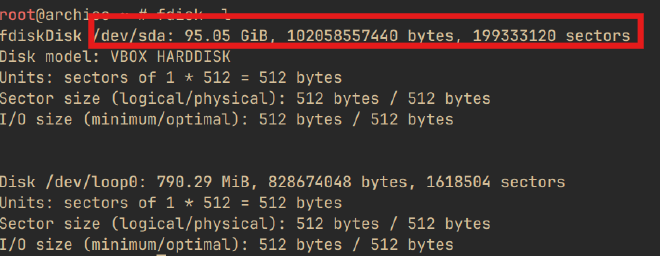
lsblk
Partition the disk:
fdisk /dev/sda
Then follow the command in the image:
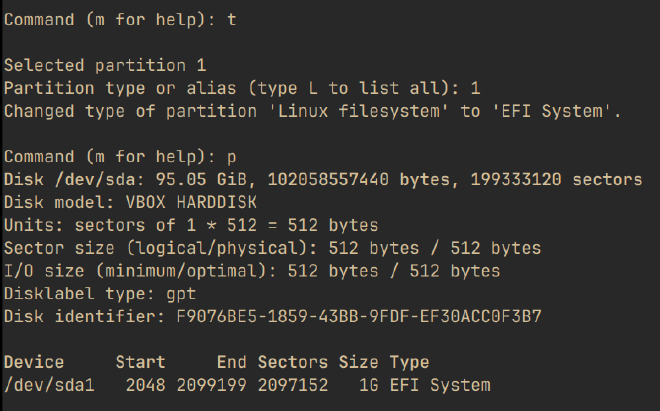
- Press
nto create a new partition. - Enter
2as the partition number. - Leave the default values for the first and last sectors.
- Change the partition type to
Linux LVMby:- Pressing
t, then entering44. - Verify the partition setup by pressing
p.
- Pressing
- Press
wto write the changes and persist them
The final result should be: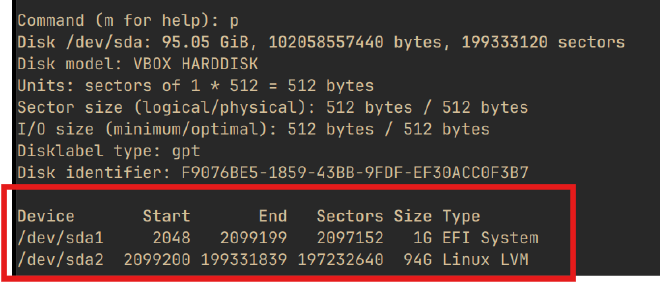
Important: A general rule for sizing the swap partition is:
- Systems with 2GB RAM → 2x swap (double the RAM)
- Systems with 2–8GB RAM → 1x swap (equal to the RAM)
- Systems with 8–64GB RAM → 0.5x swap (half the RAM)
- Systems with 64GB+ RAM → Minimum 4GB swap
Although the suggested swap size in my case was 8GB, I decided that 4GB was sufficient for this learning experience. However, for optimal performance, I recommend following the rule above based on your system’s RAM.
After partitioning, configure encryption with LUKS:
# LVM on LUKS
cryptsetup luksFormat /dev/sda2 # choose a passphrase and keep it in a secure place
cryptsetup open /dev/sda2 cryptlvm # open the encrypted disk
pvcreate /dev/mapper/cryptlvm
vgcreate gandalf /dev/mapper/cryptlvm
vgdisplay
lvcreate -L 4G -n swap gandalf
lvcreate -L 30G -n root gandalf
lvcreate -l 100%FREE -n home gandalf
lvdisplay
Final result with encryption and LVM: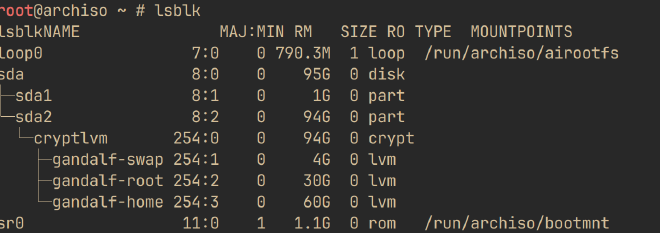
Mount the partitions:
mkfs.ext4 /dev/Gandalf/root
mkfs.ext4 /dev/Gandalf/home
mkswap /dev/Gandalf/swap
mount /dev/Gandalf/root /mnt
mount /dev/Gandalf/home /mnt/home
swapon /dev/Gandalf/swap/
#boot partition
mkfs.fat /dev/sda1
mount --mkdir /dev/sda1 /mnt/boot
Final mount: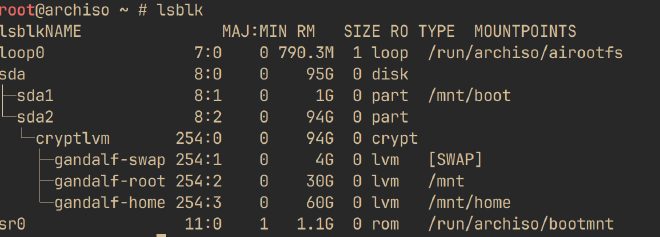
Install Arch Linux and Basic Packages#
Install Arch Linux:
pacstrap -K /mnt base linux linux-firmware
Generate the fstab file:
genfstab -U /mnt >> /mnt/etc/fstab
# chroot
arch-chroot /mnt
The arch-chroot command allows us to enter the actual Arch Linux installation on the disk, providing an environment where we can make further configurations as if we were booted directly into the installed system.
Set the time zone:
ln -sf /usr/share/zoneinfo/Europe/Rome/etc/localtime
hwclock --systohc
date # check if the date is correct

Install useful packages:
pacman -Syu vim sudo lvm2 man-pages man-db texinfo which neofetch
Set up the localization:
- Edit
/etc/locale.genand uncommenten_US.UTF-8 UTF-8 locale-gen- Edit
/etc/locale.conf - Add
LANG=en_US.UTF-8 - Edit
/etc/vconsole.conf - Add
KEYMAP=us
Network Configuration#
For network setup, I used systemd-networkd:
systemctl enable systemd-networkd.service
systemctl enable systemd-resolved.service # dns service
Configure the wired network interface (e.g., enp0s3):
vim /etc/systemd/network/20-wired.network
[Match]
Name=enp0s3

[Network]
DHCP=yes
Set up the hostname:
vim /etc/hostname # choose whatever name you like
Initramfs and Bootloader#
The main purpose of the initramfs is to bootstrap the system to the point where it can access the root file system . This includes setting up the storage stack where the root file system may be lying (in my case with dm-encrypt).
Since we are using systemd boot , edit the mkinitcpio.conf to add necessary hooks:
vim /etc/mkinitcpio.conf
# Replace the existing Hooks with this below
HOOKS=(base systemd autodetect microcode modconf kms keyboard sd-vconsole block sd-encrypt lvm2 filesystems fsck)
Regenerate the initramfs:
mkinitcpio -P
Then initialize the boot loader:
bootctl install
bootctl update
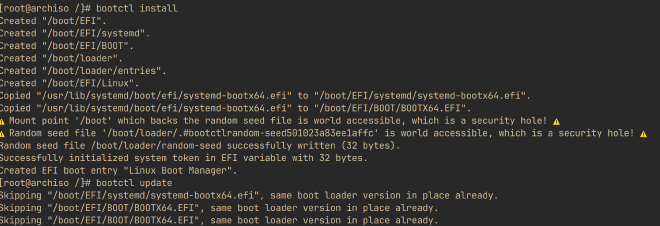
systemd-boot will search for boot menu items in esp/loader/entries/*.conf and additionally in boot/loader/entries/*.conf :
vim /boot/loader/entries/arch.conf
Add:
title Arch Linux
linux /vmlinuz-linux
initrd /initramfs-linux.img
options rd.luks.name=device-UUID=<volume-group> root=/dev/<volume-group>/root rw
For the device-UUID you can check either with cat /etc/fstab or blkid:
Pick the UUID of the second block partition (/dev/sda2).
Regenerate the initramfs:
mkinitcpio -P
User Setup#
Create a user and set passwords:
useradd alfonso
usermod -aG wheel alfonso # wheel group root of linux system
groups alfonso # check the user is in the wheel group
passwd # root password
passwd alfonso # user password
Then:
visudo
Uncomment:
Verify whether the boot is working by running the poweroff command to shut down the VM, then boot it up again. If everything is correct, you will be prompted to enter the passphrase to unlock the encrypted root partition, after which you can log in to the system with the user you created earlier.
mkdir /home/alfonsoGNOME Setup#
Right now, the system is very minimal without any desktop environment or compositor. For the desktop, I lean towards GNOME because it is lightweight, and the configuration is pretty straightforward.
In the following days, I will try both Sway and Hyprland, and I will make a comparison between them.
For setting up gnome:
pacman -S base-devel gnome gnome-extra gdm
Leave the default installation options and then run:
systemctl enable --now gdm
You will now be greeted with the GNOME login screen. After entering your credentials, you’ll land on the GNOME desktop.
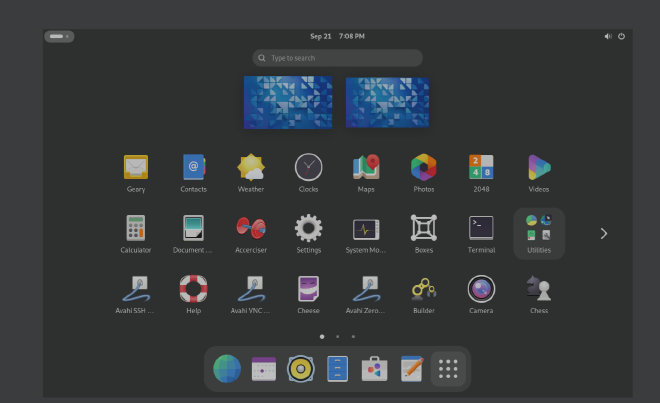
console, right-click to pin it, and open it:
neofetch
You can customize the appearance by going into Settings.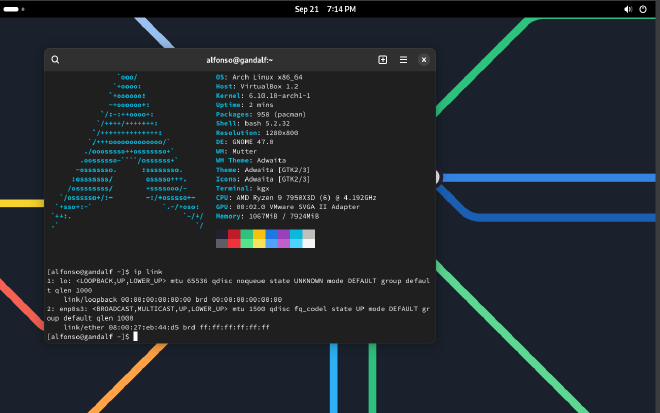
Wrap up#
The hard way of installing Arch Linux is an excellent way to brush up on your Linux knowledge, forcing you to think through every step. Arch’s minimalist philosophy allows you to customize everything to your preference.
Stay tuned for my next post, where I’ll explore different desktop environments like Sway and Hyprland, as well as the final installation on my Framework laptop.

